Now that it's well and truly bedded-in I thought it'd be nice to go over my config to see what it does. Maybe having a fully worked example will be helpful for other people, but I think mostly it'll help me remember why I configured some things in the way that I did 😂
This diagram is a bit janky and incomplete, but it's representative and will do the job. Note to self, try using drawthe.net next time, it seems nifty.
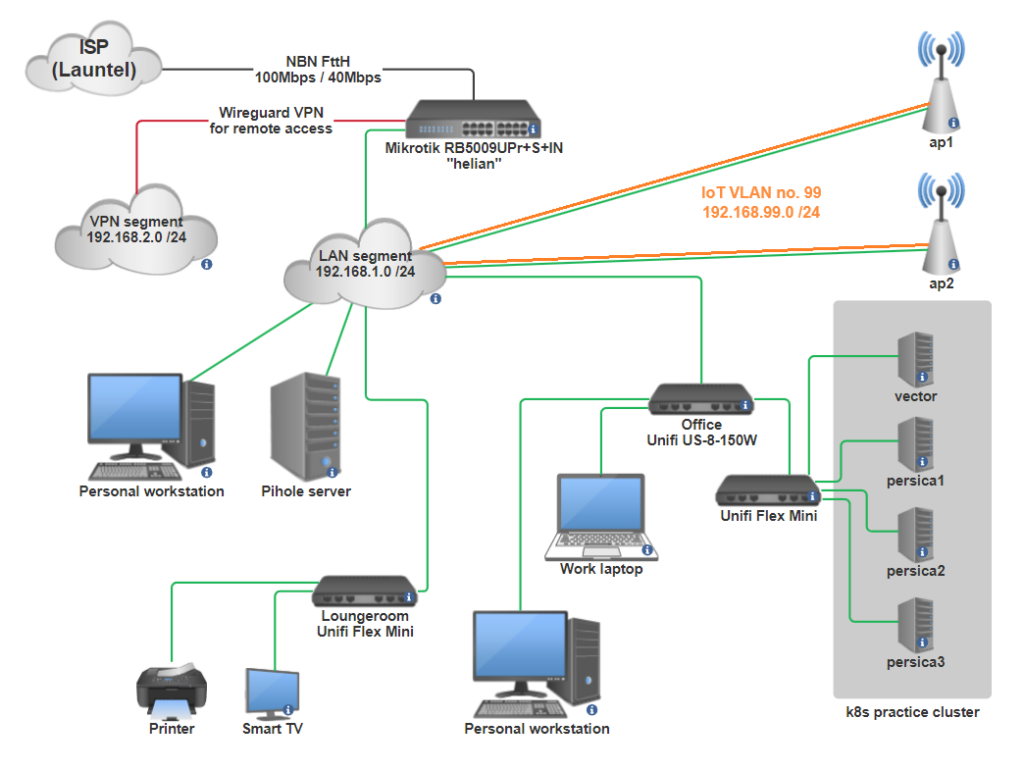
This is not a verbatim export dump from the CLI, I've rearranged it into a (hopefully) coherent story that's easier to understand instead.
We start with some default out-of-box bridging. The RB5009 has 8 RJ-45 ports named ether1 to ether8, and an SFP+ port that I don't care about for now. ether1 is the ISP port and everything else is bridged together for the LAN.
# Enable jumbo frames everywhere, and give the interfaces nicer names.
# The interface naming wouldn't be practical in larger deployments but
# it's nice in this case because you can refer to each port semantically.
# Instead of saying "X connects to ether4", then needing to lookup what
# device is connected to ether4 every time.
# We use comments because those show up in the Winbox interface, and is
# much easier to read in that context.
/interface ethernet
set [ find default-name=ether1 ] comment=ISP name=isp poe-lldp-enabled=yes \
    poe-out=off
set [ find default-name=ether2 ] comment="AP Lite" l2mtu=9216 mtu=9000 name=\
    ap-lite poe-lldp-enabled=yes poe-priority=20
set [ find default-name=ether3 ] comment="AP Pro" l2mtu=9216 mtu=\
    9000 name=ap-pro poe-lldp-enabled=yes poe-priority=20
set [ find default-name=ether4 ] comment="Loungeroom" l2mtu=9216 \
    mtu=9000 name=sw-loungeroom poe-lldp-enabled=yes poe-priority=60
set [ find default-name=ether5 ] comment="Game room PC" l2mtu=9216 mtu=9000 \
    name=game-room-pc poe-lldp-enabled=yes poe-priority=60
set [ find default-name=ether6 ] comment="Office" l2mtu=9216 mtu=9000 \
    name=office poe-lldp-enabled=yes poe-priority=60
set [ find default-name=ether7 ] l2mtu=9216 mtu=9000 poe-lldp-enabled=yes
set [ find default-name=ether8 ] comment=calico l2mtu=9216 mtu=9000 name=\
    calico poe-lldp-enabled=yes
set [ find default-name=sfp-sfpplus1 ] l2mtu=9216 mtu=9000

# We'll create a bridge over interfaces ether2 to ether7. The native MAC
# address of port ether2 is used for the bridge, and we name it "local"
# because it's not the WAN. This bridge is the same as what you'd create
# in linux using "brctl addbr local".
# We've enabled vlan-filtering, which will be an important part of the
# desired behaviour later on.
/interface bridge
add admin-mac=48:A9:8A:34:3D:A2 auto-mac=no name=local priority=0x3000 \
    vlan-filtering=yes

# Add all the LAN ports to the bridge, similar to "brctl addif"
/interface bridge port
add bridge=local comment="AP Lite" interface=ap-lite
add bridge=local comment="AP Pro" interface=ap-pro
add bridge=local comment="Loungeroom switch" interface=sw-loungeroom
add bridge=local comment="Game room PC" interface=game-room
add bridge=local comment="Office" interface=office
add bridge=local interface=ether7
add bridge=local comment=calico interface=calico
add bridge=local interface=sfp-sfpplus1
Code language: Microtik RouterOS script (routeros)
That's the basics out of the way. This doesn't give us working internet yet, as we haven't configured the WAN port or NAT yet, but we'll get there soon.
One other thing we need is an additional tagged VLAN. I want to have a separate Wifi subnet for IoT traffic, which can be firewalled as needed and only has limited bandwidth. The access points are already configured with a separate VLAN from my old Unifi router setup, so we just need to pass them the tagged VLAN that they expect (they run a cut-down linux distro that you can SSH to and inspect, it's nice).
# We define the new VLAN and its numeric VLAN tag
/interface vlan
add interface=local name=IOT99 vlan-id=99

# Then add the VLAN to the bridge. Note that this is a new config
# hierarchy compared to the one we used earlier. Before it was under
# /interface/bridge/port, now we're using /interface/bridge/vlan
# This VLAN isn't used untagged (natively) on any ports, it's ONLY a
# tagged VLAN. We add it to the "local" bridge, and the AP ports.
/interface bridge vlan
add bridge=local tagged=local,ap-lite,ap-pro vlan-ids=99
Code language: Microtik RouterOS script (routeros)
Now we get into the IP addressing, this is super simple.
# Notice how we add an address to the "local" bridge, and to the "IOT99"
# VLAN. Conceptually they're both interfaces, similar to what you'd see
# from the output of "ifconfig" on linux.
/ip address
add address=192.168.1.1/24 interface=local network=192.168.1.0
add address=192.168.99.1/24 comment=IOT interface=IOT99 network=192.168.99.0Code language: Microtik RouterOS script (routeros)
We prepare a couple of IP pools and configure DHCP - both the client on the ISP-facing interface, and a server to hand out addresses on the LAN. We'll also setup the local DNS resolver for the network.
# With this, our router will now be online \o/
/ip dhcp-client
add interface=isp

# This is the ISP's DNS server, it's fine
/ip dns
set allow-remote-requests=yes servers=203.12.12.12

# RouterOS makes it easy to define additional local DNS records,
# so we'll take advantage of that too. Later on I'll be using
# Pihole to handle DNS for the LAN though.
/ip dns static
add address=192.168.1.1 name=helian.thighhighs.top

# A pool is not the same as a subnet. I've defined a semantic boundary
# between regular clients, and network infra like APs and switches.
# Some Unifi switches (the Flex Mini) need to use DHCP to avoid getting
# bricked during firmware updates, so we accommodate that >_>
/ip pool
add name=clients ranges=192.168.1.2-192.168.1.191
add name=infra ranges=192.168.1.224-192.168.1.254
add name=iot ranges=192.168.99.2-192.168.99.100

# The DHCP server listens on the specified interfaces and hands out addresses
# from the supplied pool.
/ip dhcp-server
add address-pool=clients interface=local lease-time=10m name="dhcp general"
add address-pool=iot interface=IOT99 name="iot devices"
Code language: Microtik RouterOS script (routeros)
I like everything to use DHCP, but with static reservations so that I can have a public DNS zone that refers to it. So I have a tonne of those, I've included just a handful as examples.
One really nice feature is that you can define per-client DHCP options. It took me a little while to find this, because I expected I'd need to define the options on a per-pool basis, but actually you just define a more-specific "network" in the DHCP server and override the options. By doing this I can have PXE boot configs for the k8s nodes, and a custom DNS resolver for my own devices, without disturbing the default values for the whole LAN subnet.
# Again we use comments to identify the device getting the static
# reservation, and each one is identified by its MAC address.
/ip dhcp-server lease
add address=192.168.1.228 comment=ap3-Lite mac-address=FC:EC:DA:E8:D3:3B
add address=192.168.1.230 comment=ap5-Pro mac-address=F0:9F:C2:29:04:12
add address=192.168.1.232 comment="sw-persica Flex Mini" mac-address=74:AC:B9:46:18:5B
add address=192.168.1.26 comment=calico mac-address=92:59:BD:B7:CE:1E server="dhcp general"
add address=192.168.99.12 comment=funicular mac-address=10:0C:6B:4B:8A:98 server="iot devices"

# This defines the default settings for all hosts in the LAN:
/ip dhcp-server network
add address=192.168.1.0/24 comment=thighhighs.top dns-server=192.168.1.1 \
    domain=thighhighs.top gateway=192.168.1.1 netmask=24

# The kubernetes cluster has a PXE boot config so they can be
# reimaged easily:
add address=192.168.1.32/29 boot-file-name=grub/grubx64.efi comment=\
    "persica k8s cluster" dns-server=192.168.1.26 domain=thighhighs.top \
    gateway=192.168.1.1 netmask=24 next-server=192.168.1.32

# My personal devices use calico for DNS resolution, which is a small
# box running Pihole:
add address=192.168.1.64/29 comment="Furi's devices" dns-server=\
    192.168.1.26 domain=thighhighs.top gateway=192.168.1.1 netmask=24

# IoT devices also use Pihole for resolution, to block ads and other crap
add address=192.168.99.0/24 comment="IOT network" dns-server=192.168.99.1 \
    gateway=192.168.99.1 netmask=24
Code language: Microtik RouterOS script (routeros)
Now we get to IPv6 support. My ISP, Launtel, supports it natively which is excellent, and RouterOS makes it super simple to configure. Launtel delegates a /48 prefix to me, then the router advertises that into the LAN. Hosts will autoconfigure and grab a /64 address out of the delegated prefix.
/ipv6 dhcp-client
add add-default-route=yes interface=isp pool-name=Launtel request=prefix

# I can't remember if this was done automatically for me... either way,
# we're just assigning a v6 address to the outside and inside interfaces
# based on the usual Modified EUI-64 address derivation method.
/ipv6 address
add address=::4aa9:8aff:fe34:3da1 eui-64=yes from-pool=Launtel interface=isp
add address=::4aa9:8aff:fe34:3da2 eui-64=yes from-pool=Launtel interface=localCode language: Microtik RouterOS script (routeros)
I'm going to skip most of the firewalling stuff because it's really tedious. You need to do your own stuff anyway, so there's not much interesting here. IPv6 firewalling is a separate config section, I've not included it here because almost everything you need is part of the default config. I added a couple of rules to forward inbound traffic to illustrious (the webserver), that's about it.
# Start by defining some interface lists, this is really just a convenience.
/interface list
add comment=defconf name=WAN
add comment=defconf name=LAN

# This represents most of what we care about, traffic either moving
# from outside to inside, or vice-versa.
/interface list member
add interface=local list=LAN
add interface=isp list=WAN

# Most of these are default rules that will come with an out-of-box
# config.
# Accept inbound traffic if it's already on the way in, accept ICMP,
# and dump everything else.
/ip firewall filter
add action=accept chain=input comment=\
    "defconf: accept established,related,untracked" connection-state=\
    established,related,untracked
add action=drop chain=input comment="defconf: drop invalid" connection-state=\
    invalid
add action=accept chain=input comment="defconf: accept ICMP" protocol=icmp
add action=drop chain=input comment="defconf: drop all not coming from LAN" \
    in-interface-list=!LAN

# Mikrotik devices can have hardware-offloaded packet filtering and I have
# no idea how it works. But if it works then keep doing it! Again we
# forward in (or out) any established traffic and drop everything else.
add action=fasttrack-connection chain=forward comment="defconf: fasttrack" \
    connection-state=established,related hw-offload=yes
add action=accept chain=forward comment=\
    "defconf: accept established,related,untracked" connection-state=\
    established,related,untracked
add action=drop chain=forward comment="defconf: drop invalid" \
    connection-state=invalid
add action=drop chain=forward comment=\
    "defconf: drop all from WAN not DSTNATed" connection-nat-state=!dstnat \
    connection-state=new in-interface-list=WAN

# Standard source-NAT for outbound traffic from the LAN
add action=masquerade chain=srcnat comment="defconf: masquerade" \
    ipsec-policy=out,none out-interface-list=WAN

# I have a static public IP address so I can host web content from home.
# We dest-NAT inbound requests and forward them to the web server.
add action=dst-nat chain=dstnat comment="illustrious HTTP forwarded" \
    dst-address=198.51.100.135 dst-port=80 log-prefix=\
    "illustrious HTTP in DNAT" protocol=tcp to-addresses=192.168.1.12 \
    to-ports=80
add action=dst-nat chain=dstnat comment="illustrious HTTPS forwarded" \
    dst-address=198.51.100.135 dst-port=443 log-prefix=\
    "illustrious HTTPS in DNAT" protocol=tcp to-addresses=192.168.1.12 \
    to-ports=443

# Now we have something a little bit interesting. I host websites on
# illustrious (referenced above) and those inbound connections get
# dest-NAT'd on the firewall. I'd like to access those websites from
# the LAN as well, using the public IP address because I have public
# DNS records pointing at it. This is where we need to do hairpin NAT.
/ip firewall nat
add action=masquerade chain=srcnat comment="illustrious HTTPS hairpin NAT" \
    dst-address=192.168.1.12 dst-port=443 out-interface-list=LAN protocol=tcp \
    src-address=192.168.1.0/24
add action=masquerade chain=srcnat comment="illustrious HTTP hairpin NAT" \
    dst-address=192.168.1.12 dst-port=80 out-interface-list=LAN protocol=tcp \
    src-address=192.168.1.0/24Code language: Microtik RouterOS script (routeros)
The hairpin NAT thing is better described by Mikrotik's own docs, with a full worked example: https://help.mikrotik.com/docs/display/ROS/NAT#NAT-HairpinNAT
There's a bunch of good systemwide stuff that should be configured, how you do this is up to you. This is provided with minimal explanation.
# Disable stuff you don't use, always a good idea. No I don't know
# the difference between "api" and "winbox".
/ip service
set telnet address=192.168.1.0/24 disabled=yes
set ftp address=192.168.1.0/24 disabled=yes
set www address=192.168.1.0/24
set ssh address=192.168.1.0/24
set www-ssl address=192.168.1.0/24 certificate="thighhighs.top cert 2022" \
    disabled=no
set api address=192.168.1.0/24
set winbox address=192.168.1.0/24
set api-ssl address=192.168.1.0/24 certificate="thighhighs.top cert 2022"


# I like using newer algos (and Ed25519 keys are much shorter). Always
# disable weak crypto where possible, algorithms only get weaker over time.
/ip ssh
set always-allow-password-login=yes host-key-type=ed25519 strong-crypto=yes


# UPnP is useful for games and other human applications. Not ideal but useful.
# Read more here: https://help.mikrotik.com/docs/display/ROS/UPnP
/ip upnp
set enabled=yes
set allow-disable-external-interface=no

/ip upnp interfaces
add interface=isp type=external
add interface=local type=internal

/system clock
set time-zone-name=Australia/Sydney

/system identity
set name=helian

/system note
set show-at-login=no

# Accurate time is really important, don't miss out on it.
# Dunno why I list two servers, just the latter one is probably fine.
/system ntp client
set enabled=yes

/system ntp client servers
add address=54.66.115.132
add address=pool.ntp.org

# I forget what the rest of these do, it's probably good.
/ip neighbor discovery-settings
set discover-interface-list=LAN

# https://help.mikrotik.com/docs/display/ROS/MAC+server

/tool mac-server
set allowed-interface-list=LAN


/tool mac-server mac-winbox
set allowed-interface-list=LAN

Code language: Microtik RouterOS script (routeros)
Finally we have Wireguard, which is one of the major reasons I wanted to get a Mikrotik router. Having a good VPN server built into the router makes config so much simpler. I used wireguardconfig.com to make up some fresh public and private keys for this bit.
# Define a Wireguard interface, it's a little bit magic in that it
# listens, but isn't bound to a specific real interface. Of course
# we only care about it listening on the "isp" interface.
/interface wireguard
add listen-port=8443 mtu=1420 name=AreaS09 private-key=\
    "6PzVf/F33iw85ULr6heNAhyb8lyRuiBQ334cJSruuGc="

# Assign an address to the interface, it's like a LAN segment.
/ip address
add address=192.168.2.1/24 interface=AreaS09 network=192.168.2.0

# Add it to the LAN interface list to simplify firewalling. This helps
# because we want to masquerade traffic from the VPN to the internet,
# just like regular LAN traffic.
/interface list member
add interface=AreaS09 list=LAN

# Define our clients that will be connecting remotely, this is all
# normal Wireguard stuff.
/interface wireguard peers
add allowed-address=192.168.2.66/32 comment=hk416 interface=AreaS09 \
    persistent-keepalive=1m1s preshared-key=\
    "6wyWBanIiqHLy+eGo7KNYAW8n8fwSDQeyKYAPhU76dA=" public-key=\
    "V/lk4kPKfUvT6k08iIQuu20acyhnfd9cIhI0OIERlUE="
add allowed-address=192.168.2.69/32 comment=welrod interface=AreaS09 \
    persistent-keepalive=1m1s preshared-key=\
    "yinoovMMC1BFEOjqIzAILXkPxmednNN12wGN+62jttw=" public-key=\
    "X7j2fOba0HfyplWKpmcycpXM2zx+p05ewJLle2H8QjQ="

# Add firewall rules to permit inbound Wireguard connections to the router,
# and for clients to traverse the router.
/ip firewall filter
add action=accept chain=input comment="wireguard remote clients" \
    connection-state="" dst-port=8443 protocol=udp
add action=accept chain=forward comment="wireguard clients" connection-state=\
    new in-interface=AreaS09
Code language: Microtik RouterOS script (routeros)
And that's pretty much it. The config works great and it hasn't missed a beat. In general, Mikrotik's first-time docs are a good guide too: https://help.mikrotik.com/docs/display/ROS/First+Time+Configuration